Shopify SEO – The Ultimate E-commerce SEO Store Guide

You have a Shopify store and want to attract an insane amount of traffic?
If so, you’re in the right place.
In this post, I’ll teach you everything you need to know to optimize your Shopify e-commerce website for search engines with a step by step SEO (Search Engine Optimization) guide.
In this way, you can put your team to work on the SEO factors that really matter!
TABLE OF CONTENTS
- Sell a single product line per Shopify store;
- Use Keywords in the main domain;
- Organize the URLs structure of your Shopify store;
- Use Shopify Collections to optimize your content structure
- Set up Google Analytics;
- Set up Google Search Console;
- Optimize your text structure with headings and subheadings;
- Optimize your eShop for semantic SEO;
- Do a keyword research;
- Optimize your pages for organic CTR;
- Exploit long content to optimize your product pages;
- Maximize the page load speed;
- Optimize images for search engines.
SELL A SINGLE PRODUCT LINE PER SHOPIFY STORE
According to a 2019 survey of DigitalCommerce360 (previously Internet Retailer), there are between 12M to 24M e-commerce sites in the world. And everyone competes for the same real estate in the search results.
Google’s work is to match the relevancy of each web page with users’ intent. In this way, Google skims and selects the search results to place in the SERP (Search Engine Results Pages).
The first step to help Google in its work is to clarify what your store is all about.
What do you sell?
As a digital marketing manager for Lounge Lizard, I’ve seen many entrepreneurs using the same store to sell different products from totally different categories.
You will have a hard time to index your store if you sell clothes, accessories and jewelry all together. Google can’t understand what your website is all about.
A bad e-commerce store example is JCPenney which sells everything under the same domain: from house furniture to beauty products.
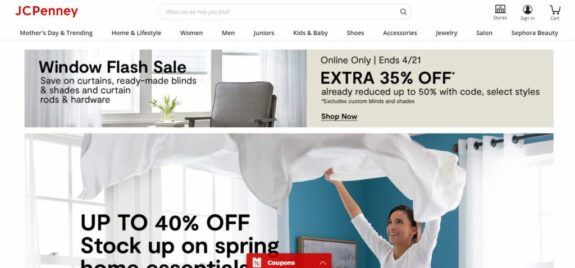
JCPenney represents a bad example of e-commerce website.
A good Shopify store example that also uses the right keyword in the domain is Dylan’s Candy Bar.
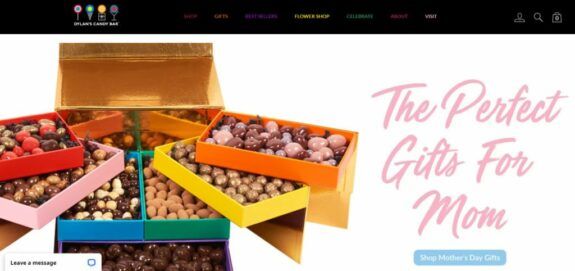
Dylan’s Candy Bar is a Shopify store developed by the digital agency Lounge Lizard.
It’s crystal clear for both Google and users that Dylan sells candies.
There are many different types of candies which Dylan has placed in proper sub-categories. But even if Dylan sells different products, at the end of the day, they are all candies!

Are you telling me that, to nail Shopify SEO, I need to focus on one product line?
Selling one single product line per e-commerce store is the best way to boost your rankings in the search.
Think about it.
Your website will be packed with keywords related to the same product category. This is a great tactic to boost relevancy and signal Google that your eshop is specialized in a certain sector.
Google loves highly focused and specialized websites, since they match exactly users’ search intent.
Selling a single product line per Shopify store also helps your brand equity grow. You will be recognized as an expert in the industry and consumers will associate your brand to the specific product category. In other words, it’ll increase your market share.
USE KEYWORDS IN THE MAIN DOMAIN
Dylan’s Candy Bar added a very relevant keyword in his domain, “candy bar” (dylanscandybar.com), which helps Google understand and index his website.
According to Moz and SEO experts like Brian Dean, the domain is one of the 200 factors that affect your rankings.
If you have already published a Shopify store on a domain that doesn’t contain relevant keywords, don’t worry at all, because you can simply purchase another domain and connect it to your store:
- Go back to your domain provider. If you don’t have one, you can pick GoDaddy, HostGator or Domain.com. I always suggest Domain.com since it has the best quality-price ratio. Also Shopify itself sells custom domains, but it is more expensive. Eventually, you can learn how to purchase a domain from Shopify by following this tutorial;
- Use tools like Ubersuggest or Google Trends to identify the most profitable keywords to insert in your domain;
- Use the search bar on your domain provider’s website to verify the availability of your new domain;
- Connect a third party domain to your Shopify store.
ORGANIZE THE URLs STRUCTURE OF YOUR SHOPIFY STORE
There are two main different ways to organize the URLs structure of your Shopify store.
Before getting into it, you need to understand how search engines interpret URLs and attribute relevancy.
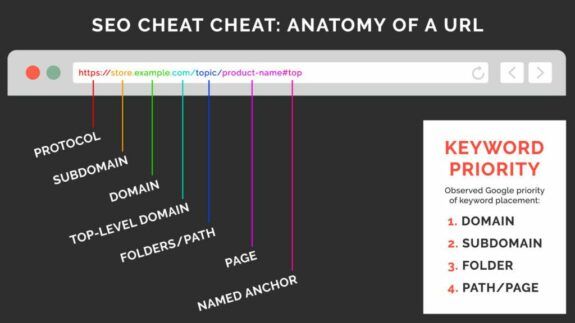
SEO cheat sheet: anatomy of a URL. Source: Moz.
The image above represents the elements that can form a URL.
While the https protocol is now standard in Shopify, I will focus on how to optimize the page path.
According to Rand Fishkin, co-founder of Moz, search engines can treat subdomains as separate entities and split your domain authority (Moz correlational data, 2015).
In other words, your SEO efforts (on-page and off-page SEO activities) and signals (e.g. traffic, bounce rate, backlinks…) on your subdomain will not affect your main domain.
For this reason, I never recommend using subdomains.
You might create subdomains to identify different departments or areas of your website. But as I have explained to you above, you want a very specific Shopify store that aims at a niche. So, you don’t actually need subdomains at all.
Everything after the domain represents a page path: the further a page is, the less relevant it is.
In other words, you want the most important pages for your core business as close as possible to the domain.
Every time you use a folder or a sub-folder, the page loses SEO juice and relevancy. It means it is more difficult to rank a page with a long path.
For instance, the URL below represents a long path, in fact the page is inside two folders:
example.com/category/subcategory/descriptive-product-name
Instead, the example below represents a shorter path:
example.com/descriptive-product-name
From an SEO perspective, you are saying that this page is very important for your business. That’s why you should be extra careful about the keywords you use.
Search engines attribute more relevancy to these keywords and use them as signals to define what your store is all about.
In any case, use a short and descriptive product name as a URL slug. The shorter the URL, the better.
According to a 2008 interview, Matt Cutts (ex software engineer at Google) revealed that after five words in your URL:
[Google] algorithms typically will just weigh those words less and just not give you as much credit.
It means that a short URL like example.com/mens-chair is easier for Google to understand than example.com/studio-furniture/contemporary/mens-chair-5-lightweight-winter-boots/1001468,default,pd.html
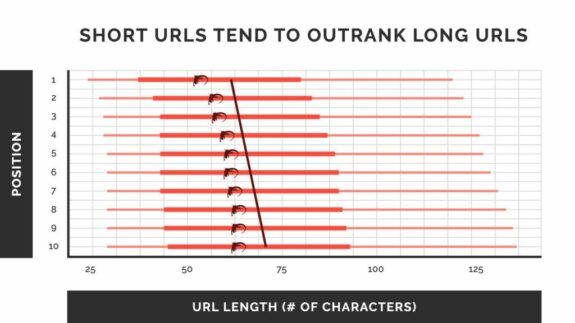
Short URLs tend to outrank long URLs. Source: Backlinko and Ahrefs, 2020.
Now that you know how to structure your URLs for better SEO results, let’s discover some strategies that you can apply to your eshop.
URLs structure for Shopify stores that sell 5 products or less
If you sell a few products, you don’t need subfolders at all. This is only true when your products belong to the same product line and are very similar to each other.
You want the path to your product pages as neat and short as possible.
The URL below represents an example of what you need to do:
example.com/descriptive-product-name
URLs structure for Shopify stores that sell more than 5 products
If your Shopify store sells multiple products, you need categories to better organize them.
When you deal with dozens or hundreds of products, categories are not only useful for SEO, but also for improving your e-commerce UX (User Experience). In fact, they help search engines and users as well.
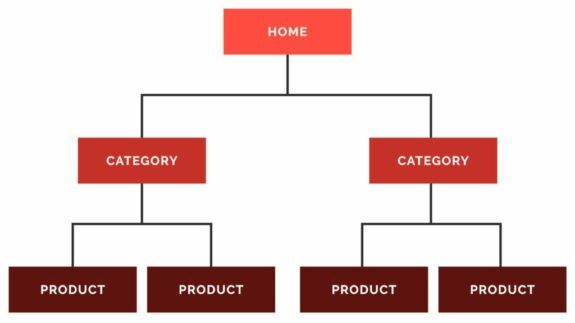
Example of website structure (sitemap).
Shopify already gives you the opportunity to create an optimized URLs structure:
- Homepage » Category Pages » Product Pages;
- Homepage » Category Pages » Sub-Category Page » Product Pages.
Remember to build your structure to help users first. If search engines understand and index your website, but users can’t find what they need, you don’t generate revenue.
For this reason, you should also add a search bar.
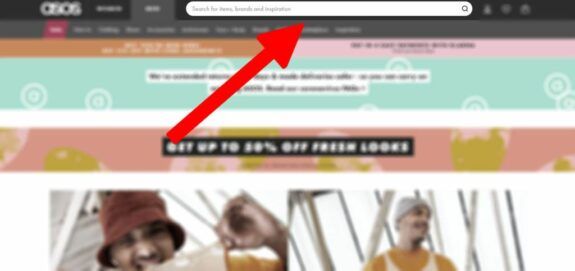
Inserting a search bar in an e-commerce store is fundamental for user experience (UX).
The last two pages you should add in your e-commerce structure are the “About” and “Contact” pages.
They are signals that you are a legit brand.
But, is it really true that you need actual pages (with their own URL) for these two sections?
My answer is no!
Sometimes, you don’t want to create an “About” or “Contact” page. For example, you want a specific design that doesn’t allow it or you don’t have enough content to craft a substantial page (thin pages will penalize the rankings of your website).
In addition, if your users need to visit the about page to understand what you do, it means that your Shopify store is not effective at all.
Visitors must understand what you do, what you sell and who you are at a glance from the homepage.
If your Shopify store has this problem, our designers can help you optimize your homepage, request a free proposal!
Google Quality Document states that they prefer websites with an “appropriate amount of contact information” and you don’t need actual pages to do that.
What you really need is to insert your contacts somewhere and enable users to easily find them (e.g. in the footer).
USE SHOPIFY COLLECTIONS TO OPTIMIZE YOUR CONTENT STRUCTURE
In Shopify, the categories mentioned before are called “Collections”.
Shopify Collections are navigation elements that help users find what they need by grouping products in categories or sub-categories (sub-collections).
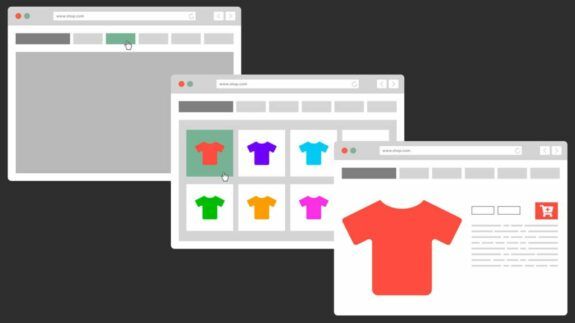
Shopify Collections represent products categories and sub-categories.
A Collection acts as a table of contents for your store. It is a hub page about a specific topic which internally links to multiple pages related to the original topic.

Factory43 Shopify e-commerce store categories and sub-categories.
Depending on your offering, your collections should start from simple categorizations and dive deeper once those are selected.
The simpler the structure, the better.
There are two types of Collections:
- Manual Collections are the best choice for small or personally curated categories. For instance, you can group items that are part of a special promotion to make sure the discount applies only to products in that Collection.
- Automated Collections associate conditions with products that will automatically get placed in them. This method is faster and helps streamline the process for eshops with a larger inventory.
Content structure and SEO Siloing Theory
Why does organizing your content affect the rankings of your eshop? What is the correlation between SEO and content structure?
The link between your Shopify architecture (or structure) and SEO is the Siloing Theory.
As I mentioned before, the first step to achieve high rankings begins by helping Google have a clear understanding of your website’s subject themes.
What is the SEO Siloing Theory?
According to Bruce Clay, SEO expert and founder of Bruce Clay Inc., siloing a website means:
Grouping related pages together, either structurally or through linking, to establish the site’s keyword-based themes. Much like farmers use separate silos to store different types of grain, webmasters can silo a website to distinguish its various content themes and make clear to search engines what the site is about.
His SEO experiments verified that building a website around themes based on keywords (and not just the keyword phrases themselves) helps rankings.
Above all, after the Panda update, Google has been rewarding websites with in-depth and well organized quality content.
In other words, search engines can only comprehend pages or websites where subjects are clear and distinct.
Let’s say that your content (or themes) are the marbles in this jar.
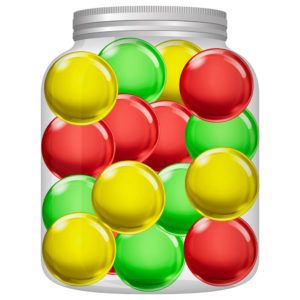
Jar with mixed marbles.
Green, red and yellow marbles are mixed together with no order or emphasis. In this case, search engines would index the subject as a “jar of marbles”. This is an example of a non-siloed website.
Now, let’s divide every group of marble into separate jars. Search engines would classify them as a green marbles jar, a red marbles jar and a yellow marbles jar.
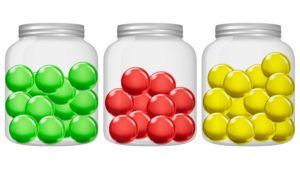
Three jars with colored marbles: a jar with green marbles, a jar with red marbles and a jar with yellow marbles.
They represent an example of three separate websites. But what if we put the marbles back into one jar and organize them by color?
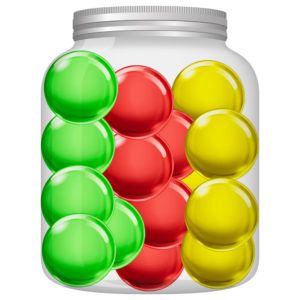
Jar with marbles organized in silos.
The image above represents a website with topics separated into theme-specific categories or silos.
The SEO Siloing Theory is the reason why you should use categories and subcategories to structure your Shopify store content.
Let’s consider an e-commerce website which sells power tools. It should have a content structure organized like the image below.
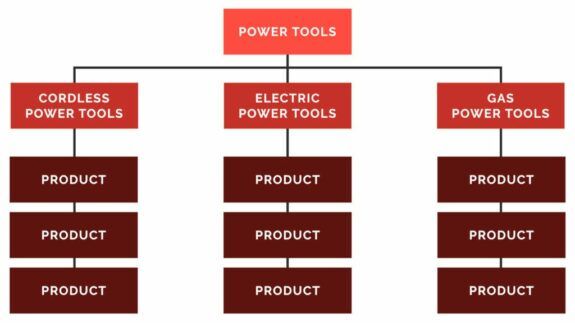
Example of correct website architecture according to the SEO siloing theory.
If you link together pages strictly related to a topic or theme, you will be able to consolidate that theme-relevance to a section of your site.
As Bruce Clay says:
A site hierarchy, with top-level landing pages and support pages for each SEO silo, emerges based on linking patterns alone.
In other words, you shouldn’t build your internal link structure in a random way.
Support pages should link to their silo landing page and cross-links between silos should be avoided.
You can eventually link supporting pages to the silo top landing pages, but remember: random links between supporting pages in different silos can weaken the theming. The image below represents an example of “acceptable” and “unacceptable” links.
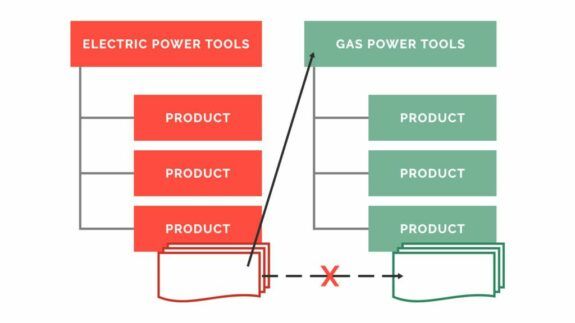
Example of acceptable and unacceptable linking in the SEO siloing theory.
SET UP GOOGLE ANALYTICS
Once your Shopify store architecture is ready to go, you should install a tool to monitor the performance of your site.
Google Analytics is a free and precise tool to keep track of your e-commerce website performance. You need such a tool to improve and optimize your website over time.
If you haven’t done so before, follow these instructions to install Google Analytics Tracking ID in your Shopify store header.
Once the tracking code is up and running, you can navigate to Google Analytics dashboard and set up your e-commerce goals.
In this way, you will attribute a monetary value to certain actions undertaken by your visitors. For example, you can correlate the quality of traffic with sales, set a value for downloads, forms submissions and much more.
You should review Google Analytics data once per week to improve the SEO of your site.
SET UP GOOGLE SEARCH CONSOLE
One of the most important SEO activities is to submit your sitemap to relevant search engines.
Google is the most popular, but there are many other search engines (e.g. Yahoo!, Bing, Baidu, Yandex…) that you can use to target a specific niche of consumers. If your eshop targets those niches, you must submit your sitemap to multiple search engines.
Submitting your sitemap means that you share with a search engine the URLs structure of your website. In this way, search engines can crawl your Shopify store and easily index your content.
Every Shopify store automatically creates a sitemap that you can find by adding /sitemap.xml after your domain:
example.com/sitemap.xml
If you don’t know how to do it, read this guide on how to submit your sitemap to Google Search Console.
If you want to submit your sitemap to different search engines, replicate the same procedure in their Webmaster Tools accordingly:
- Google Search Console;
- Bing Webmaster Tools (for Bing and Yahoo!);
- Yandex Webmaster Tools;
- Baidu.
According to a 2020 statistic of GlobalStats – StatCounter, Google reigns undisputed with 91.91% of market share. It is followed by Bing (2.78%), Yahoo! (1.7%), Baidu (1.13%) and Yandex (0.55%).
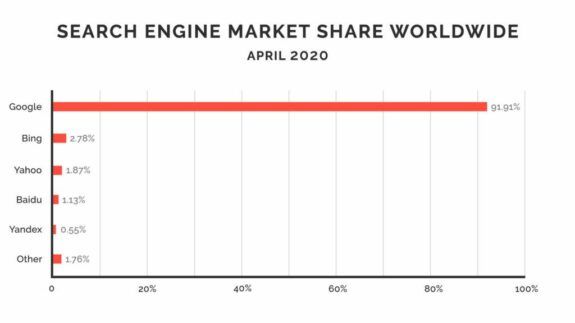
Search engine market share worldwide. Source: GlobalStats – StatCounter, April 2020.
You should monitor your Search Console account weekly and correct the errors reported.
Sometimes, crawlers try to reach a specific page of your website, but they fail. Every Webmaster Tool tells you what causes the error, so you can go back to your Shopify store and correct it.
OPTIMIZE YOUR TEXT’S STRUCTURE WITH HEADINGS AND SUBHEADINGS
You can mark the relevancy of each text by using heading tags: H1, H2, H3, H4 and so on.
Like in a book, you can create titles, subtitles and paragraphs to help users and search engines understand the importance of each text portion.
According to HubSpot Consumer Behavior Survey 2016, 41% of people skim content while reading online. And this percentage is increasing year over year.
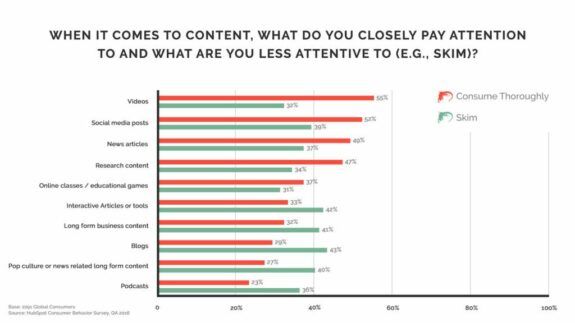
When it comes to content, what do you closely pay attention to and what are you less attentive to (e.g. skim)? – Source: HubSpot Consumer Behavior Survey 2016.
If you don’t structure your Shopify pages with headings, users won’t be able to identify the most important sections. If they can’t skim your content, they will leave your site and your bounce rate will rise.
Bounce rate is a key metric search engines use to determine your rankings.
How to use heading tags
The most important heading tag is the H1. You should have only one H1 tag for each page.
The H1 represents the title of a page and should be positioned as high as possible.
The second most important heading tag is the H2. You can insert as many H2 as you want.
Organize your content according to their importance:
- Give a title to the page by using an H1;
- Divide your text into different sections by using H2;
- If a section can be further split into additional paragraphs, use H3 to name them;
- If your content is very complex and needs more subparagraphs, you can follow the heading tags hierarchy to mark each title and subtitle accordingly (H4, H5, H6).
A proper heading tag structure acts as a table of contents for search engines allowing them to understand the topic of the page.
In addition, your Shopify store will be aligned with semantic SEO best practices.
OPTIMIZE YOUR ESHOP WITH SEMANTIC SEO (KEYWORDS » TOPICS)
Not too long ago keywords stuffing, keywords density and other shady techniques could drive profitable results. In 2013 Google developed powerful counter-measures.
Search engines are now smart enough to interpret users’ intent (and eventually the context of their search) to deliver an answer to their question. Their algorithms and artificial intelligence (AI) have evolved beyond keywords.
To optimize your Shopify store, you have to use semantic SEO strategies rather than just focusing on keywords.
According to Brian Dean, founder of Backlinko:
Semantic SEO is the practice of writing content search engine optimized around topics, not just individual keywords.
Semantic SEO was first introduced by Google’s Hummingbird algorithm in 2013. Google stopped just looking at keywords and started reading and understanding a page’s overall topic.
What I recommend is to:
- Divide your Shopify store in themes or topics according to the SEO silo theory explained before. For example, organize your products in categories and subcategories with relevant topic-related keywords;
- Identify one keyword for which you want to rank in each page;
- Build your content around the theme represented by that keyword: use synonyms, alternatives or other keywords usually associated with that specific theme. For example, if you want to optimize a product page around the keyword “running sneakers”, you can use alternative words like “sport shoes” or “shoes for running” to help search engines contextualize your product. In this case, if you sell Nike or Adidas shoes, you can insert the keywords “Nike” and “Adidas” in your text, since they are two brands that notoriously produce sport footwear. In other words, they are theme-related words;
- Write for the users and not for search engines. Focus on user intent and experience rather than keywords.
DO A KEYWORD RESEARCH
You must know how people are searching for your products online. The only way to find out is to do keyword research.
Think of your products and use Ubersuggest to understand keywords monthly search volume and degree of competitiveness. This tool will also suggest variants and alternatives.
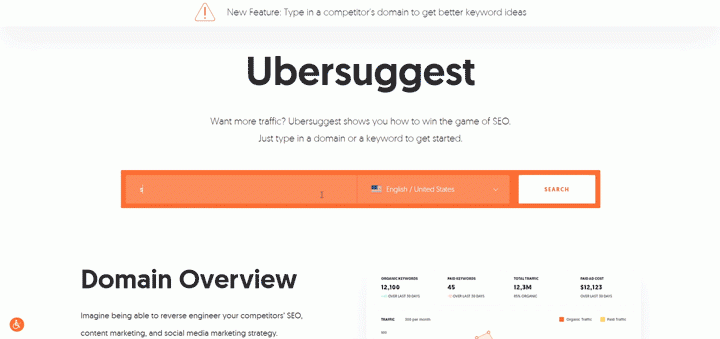
Use Ubersuggest to do your keyword research.
If you are undecided between two or more keywords, use Google Trends to compare them.
If you don’t know what people are looking for, how do you know what to optimize your pages for?
You can also use Answer The Public to discover the most common queries associated with certain keywords.
Use Answer The Public to discover queries associated with certain keywords.
Once you have identified a keyword for which you want to rank for:
- Place it in the URL;
- Insert it in the H1 and use its variants or themed-related keywords in the H2;
- Repeat the main keyword at least 3-5 times in the page (source: Brian Dean, Backlinko). It is not about keyword density or keyword stuffing, it’s just about making sure your keyword appears on your page and Google understands what your text is all about.
Add keyword modifiers to your product page H1
As I have already mentioned before, optimize your pages according to a target keyword, but don’t stop there.
You should also add keyword modifiers to your H1.
Let’s say your target keyword is “running sneakers for men”. Instead of just using this keyword alone in your product page H1, try to add a few words that people are likely to use when they search for that keyword.
Here is a list of common modifiers that people use when they search for products online:
- Cheap;
- Deals;
- Reviews;
- Best;
- Online;
- Free shipping.
For instance, our H1 could become:
“Best deals for men’s running sneakers”
OPTIMIZE YOUR PAGES FOR ORGANIC CTR (CLICK THROUGH RATE)
Organic click through rate is one of the metrics that search engines consider to set your rankings in the SERP.
What does organic click through rate mean?
Organic CTR (Click Through Rate) represents the percentage of users who view a search engine result (number of impressions) and then actually go on to click it (number of clicks). The formula for CTR looks like this:
[Total Clicks] / [Total Impressions] = Click Through Rate
If users view your pages in the SERP, but they don’t click through, search engines think those results are not relevant and decrease their rankings in the SERP.
According to a 2016 study of Larry Kim, called Does Organic CTR Impact SEO Rankings?, organic CTR has a direct impact on Google rankings.
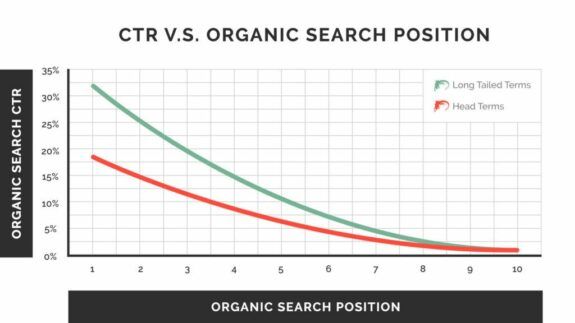
CTR vs. organic search position. Larry Kim used 1,000 keywords in the same keyword niche (to isolate external factors like Google shopping and other SERP features that can alter CTR characteristics). The keywords are all from his own website: WordStream.com. He compared CTR versus rank for 1-2 word search terms and did the same thing for long-tail keywords (4-10 word search terms).
Results show that a higher CTR than the average leads to a rankings boost.
In addition, a higher CTR means more traffic which means more sales for your e-commerce.
So, how can you optimize your titles for organic CTR?
Optimize your meta titles for CTR
Before digging in, I want to make clear that as “titles”, I mean meta titles which do not always correspond to a page H1.
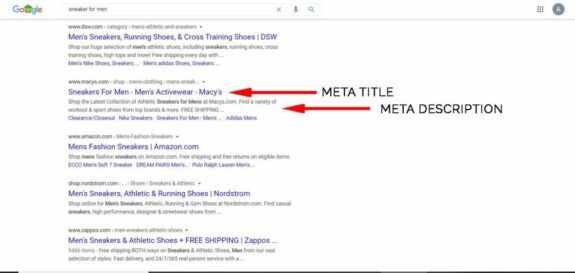
Example of meta titles and descriptions in the SERP.
While Shopify gives you the possibility to personalize the meta title and description of each page, I recommend to keep the meta title very similar to the H1. In this way, you are sure users and search engines find the same keywords in both SERP and landing page.
Remember that you have limited characters for meta titles and descriptions. Use SERPsim to optimize your search results for Google.
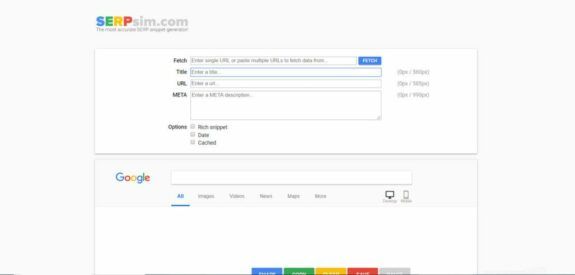
SERPsim is the most accurate SERP snippet generator and SERP simulator optimization tool.
Include brackets in your titles
According to a 2014 study of HubSpot and Outbrain called Data driven strategies for writing effective titles and headlines, headlines with brackets receive 40% more clicks.
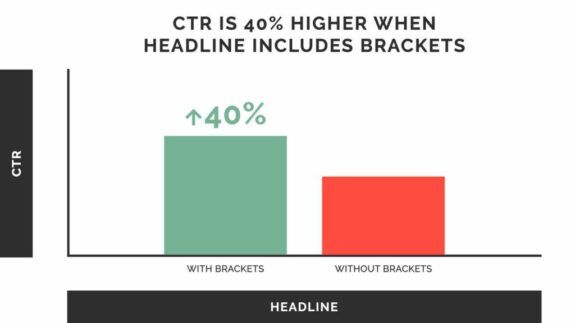
CTR is 40% higher when headline includes brackets. Source: Data driven strategies for writing effective titles and headlines by HubSpot and Outbrain, 2014.
For example, the title “Best deals for men’s running sneakers [free shipping]” or “Best deals for men’s running sneakers [2020]” will receive more clicks than just “Best deals for men’s running sneakers”.
Include numbers in your titles
It’s not a secret that numbered lists are one of the most clicked categories of articles (e.g. Top 10 running sneakers for men), but also product pages can increase their CTR by including numbers in the title.
For example, if you have a Shopify store which sells products, let’s say footwear, you can write a title like:
“Best deals for men’s running sneakers (25% off)”
Instead, if you have a Shopify store which sells services, you can write:
“Wholesale sportswear New York – Over 1000 clients served”
Include magnet words in your product pages titles
You can increase CTR by catching users’ attention with magnet words. Like heading modifiers, they are powerful words that can drive clicks on your product pages.
Here is a list of the most common magnets for e-commerce stores:
- X% off (e.g. 25% off);
- Guarantee;
- Free shipping;
- Overnight shipping;
- Sale.
Optimize your meta descriptions for CTR
Meta descriptions are not as important as meta titles, but they still play a relevant role in SEO.
Here is a list with the three key elements of a good meta description:
- Be emotional: grab people’s attention with emotionally-charged words like “amazing” or “powerful”;
- Respect the characters limit: don’t pass the limit of characters which is approximately 150. Google sets this limit not according to the number of characters, but the SERP real estate (measured in pixels) used by your description. As I have already mentioned before, use SERPsim;
- Sell your content: win the competition in the SERP with a compelling description and tell people why they should check out your page. So, be sure to include a CTA (Call To Action).
Use structured data markups to get rich snippets and sitelinks
Google can decide to include rich snippets, alternatively called rich results, in the SERP. They are search results with additional data displayed that catch users attention and provide more information.
Rich snippets are pulled from structured data found in a page HTML and usually skyrocket CTR.
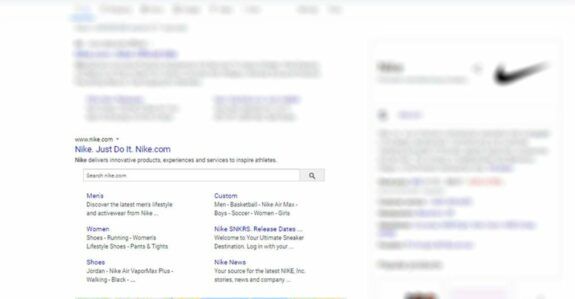
Nike’s sitelinks snippet in the SERP.
Schema.org has listed all the available markups and explains how to implement them in the website. Common rich snippets are:
- Article;
- Breadcrumb;
- Event;
- FAQ page;
- How to;
- Job posting;
- Local business;
- Organization;
- Person;
- Product;
- Recipe;
- Video;
- Website.
Some of those are already automatically generated by Shopify according to your theme and plan.
If you don’t have a developer that can help you implement Schema structured data markups in your Shopify HTML, you can use the Schema Markup Generator of TechnicalSEO.
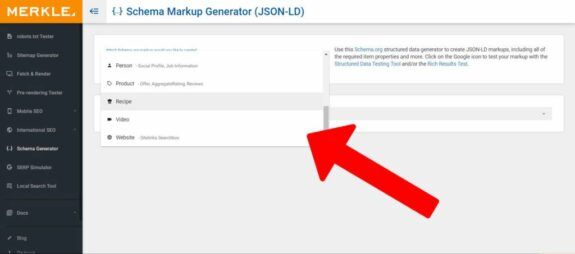
Schema Markup Generator (JSON-LD) editor by TechnicalSEO.
This tool is completely free and includes a step by step guided procedure.
Use Schema Markup Generator to create your code and test it on Google Structured Data Testing Tool.
Once you have validated your markup, insert it in your Shopify store header, body or footer accordingly.
Once your page is finally published, you can test the rich snippets by using Google Rich Results Tester.
It takes time to see the outcome of Schema markups implementations, since Google has to reindex your pages.
In general, I always recommend e-commerce stores to have these basic markups:
Product markup. It gives information about a certain product and includes images, price and availability.

Example of product’s markup rich nippet in the SERP. Source: BackLinko.
Reviews. It displays a star rating with a scale from 1 to 5 that can represent a single reviewer or an average of multiple users’ reviews.

Example of reviews’ rich snippet in the SERP. Source: BackLinko.
Organization. It helps search engines understand key information about a business, like address, logo and contacts.
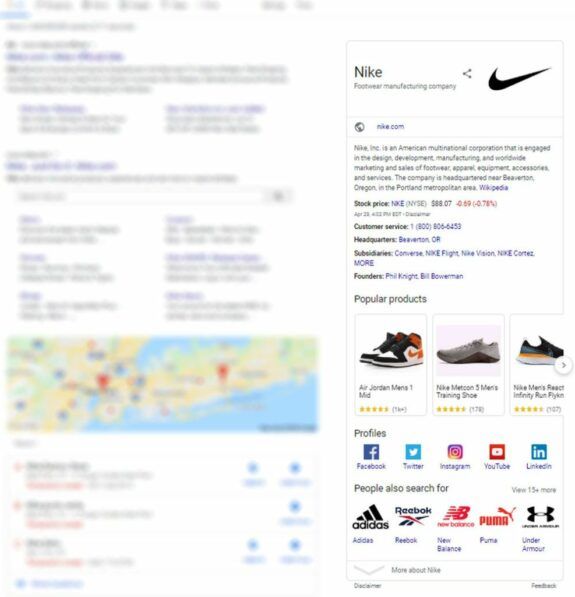
Nike’s organization Schema structured data markup in the SERP.
EXPLOIT LONG CONTENT TO OPTIMIZE YOUR PRODUCT PAGES
Google’s job is to understand what your page is all about and the more content it crawls, the better.
Longer and meaningful content provides Google all the information to contextualize the page and offer results that match users intent.
According to a 2019 study of Backlinko and BuzzSumo, the average word count of a Google top 10 result is 1,447 words.
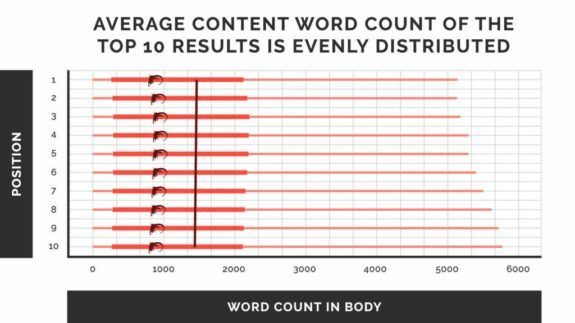
Average content word count of the top 10 results is evenly distributed. Analysis of 912 million blog posts to better understand the world of content marketing in 2019. Source: Backlinko and BuzzSumo, 2019.
The rankings factors of a product page are like any other page, so you should publish text with at least 1,000-2,000 words.
In addition, long content on your product pages helps users understand what they are about to buy. So, it should increase conversions too.
If you sell many different products, it is expensive and time consuming to produce long descriptions in hundreds of pages. In this case, I suggest optimizing the first 10 best sellers.
MAXIMIZE THE PAGE LOAD SPEED
According to Backlinko and Ahrefs, page load speed is not a ranking factor in 2020. Nevertheless, a slow website increases bounce rate which actually affects rankings.
Akamai Technologies, Inc. analyzed data of 10 billion user visits from top online retailers and discovered that a 100-millisecond delay in load time can cause conversion rates to drop by 7% (source: Online Retail Performance Report, first issued in 2017 by Soasta, a company acquired by Akamai in the same year).
Another 2017 study published by KissMetrics revealed that 79% of web shoppers who have trouble with website performance say they won’t return to the site to buy again.
It is clear that page load speed influences indirectly your rankings and affects directly your sales.
So, how can you optimize the page load speed of your Shopify store?
Measure your page speed performance
The first step is to measure the speed performance of your eshop. If you don’t know what is fast and what is not, how can you know what improvements to implement?
There are many free and freemium tools that you can use. The most popular is Page Speed Insights by Google.
I’m not a fan of it, since it is pretty basic and inaccurate. If you don’t have a strong grasp on programming and SEO, Page Speed Insights will give you basic actionable suggestions that you can implement even if you don’t have a specific technical knowledge.
If you have a team of developers or you have advanced technical skills, you should use Pingdom Website Speed Test or GTmetrix.
The main advantage of using these tools is the possibility of testing your website speed from servers located in different countries.
Besides, they deliver an in-depth report with each single element that affects your speed.
Prioritize above the fold content
According to the screen size of each device, users will see a specific section of your website first, before scrolling.
The portion of the landing page which fits in their view is called above the fold content.
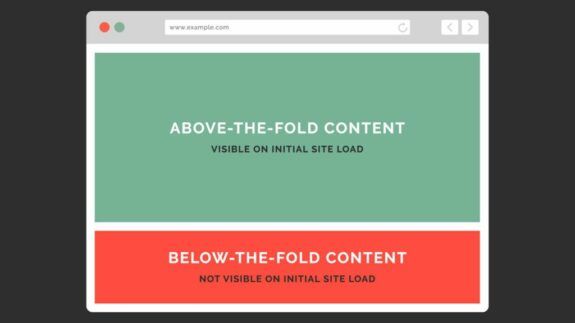
Difference between above and below the fold content.
You should enable your Shopify store to prioritize the loading of the above the fold content. In this way, users will see your content faster and the below the fold content will silently load in the background later on.
Avoid too many redirects
There are many types of redirects you can use including permanent 301 redirect and temporary 307 redirect.
In any case, simplify them as much as possible and make sure to have maximum 2 redirects per page.
Too many redirects can confuse the browser and increase page load time.
Use a Content Delivery Network (CDN)
Even though Shopify servers are located in North America, you can use API functionalities to equip your store with a CDN (Content Delivery Network).
A Content Delivery Network allows you to split a website’s content into multiple servers scattered in different locations worldwide and let the closest server provide data to local users.
Geographical proximity makes the speed load faster.
Use AMP (Accelerated Mobile Pages)
Accelerated Mobile Page (AMP) is an open source framework that allows you to build lightweight experiences for mobile by simplifying the HTML and following streamlined CSS rules.
In 2015, Google claimed AMP cut down load time between 15% and 85% in initial tests.
The best way to get AMP in your Shopify store is to pick a theme which natively supports them.
If you have already launched your e-commerce and installed a theme that doesn’t support AMP, you can enable this feature by using third party integrations on Shopify app store.
OPTIMIZE YOUR IMAGES FOR SEARCH ENGINES
Usually, e-commerce stores have more images than normal websites and if they are not optimized for search engines, they could represent a threat.
Images mainly affect two key factors:
- User experience;
- Page load speed.
According to a MIT’s research, the human brain can identify images seen for as little as 13 milliseconds (source: Detecting meaning in RSVP at 13 ms per picture published in 2013 by Attention Perception & Psychophysics).
It means that inserting images in your Shopify store is fundamental for user experience. Besides, they also increase time spent on page which is a rankings factor.
Provide multiple high quality pictures in your product pages. Enable users to explore and view your products in multiple perspectives and contexts.
If images are not resized and uploaded with a web-friendly format, they will sink your page load speed.
I always recommend to optimize images with Photoshop, because it is more professional and gives you a lot of personalization options.
Here is my step by step guide to optimize images with Photoshop:
- Name your file.
Name your Photoshop file with 4-6 words and separate them with a dash “-”. Remember to use relevant keywords.
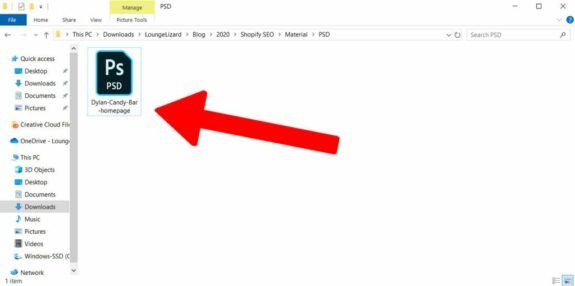
How to name a file for web.
- Embed relevant metadata.
Click on File » File Info…
When you click on “File Info…” it pops a form where you can insert all the necessary metadata.
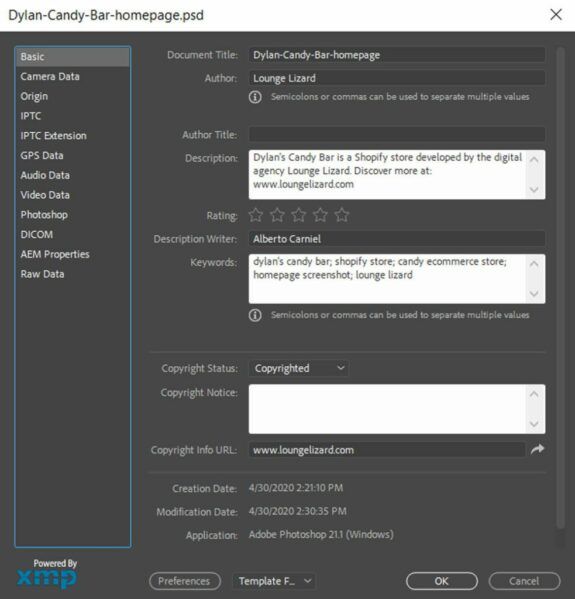
How to embed metadata in images. This image represents the file info editor in Photoshop.
As you can see from the image above, I recommend to fill at least the first page with basic metadata:
- Document Title: copy and paste the file name;
- Author;
- Description: describe the picture by inserting relevant keywords and your website (or where users can find more info about it);
- Description Writer;What is a Description Writer?
- Copyright Status: set the copyright status of the image;
- Copyright info URL: write the URL of your website or the website that owns the copyright of the image.
For local businesses, it makes sense to also insert a geotag in the picture to further emphasize local SEO.
If you can’t do it with Photoshop, you can use GeoImgr: an easy-to-use online tool that embeds geotags in your images.
- Save your image for the web.
Click on File » Export » Save for Web (Legacy).
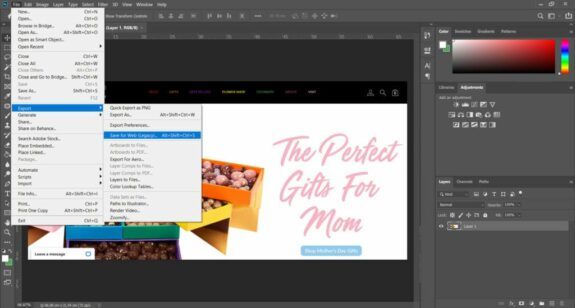
How to save images for web with Photoshop.
- Export your image with embedded metadata.
Once you have clicked on “Save for Web (Legacy)”, it pops a small editor.
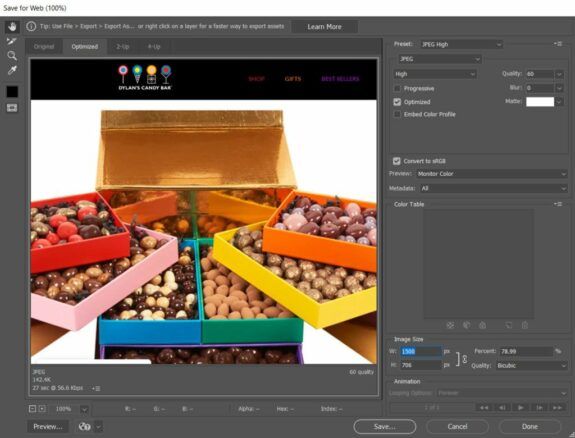
Settings to export images for web in Photoshop. Save for web (legacy) editor.
Select your preset:
- If the image has transparency, use PNG-8 256 colors. If the image size is still too high, use PNG-8 128 Dithered and select Diffusion Transparency Dither.
- If the image doesn’t have transparency, use JPEG High, quality 60.
From the menu Metadata select All. In this way, your metadata will be exported within the image.
In Image Size, set a minimum width of 1200 pixels. According to Google AMP quality guidelines, the minimum width for an image is 1200 pixels.
Finally, click Save…
3 reasons why you should embed metadata in your images
Embedding metadata in an image is important for 3 key reasons:
- SEO;
- Copyright;
- Content management.
Let’s start with SEO.
Search engines are still not able to understand images, so they need text to figure out what they are all about. Metadata enables search engines to categorize and contextualize an image for indexing.
Also keeping under control the copyright should be a priority, above all for an e-commerce store that has hundreds of unique product images.
Metadata allows you to keep track of stolen images all over the web. If you use premium services like CopyScape, you can find who copied or stole your images online.
Metadata is also important for content management.
When you upload an image, the majority of CMS (Content Management System) keeps the embedded metadata and uses them for SEO purposes.
For example, you can use the file title as URL slugs:
https://cdn.shopify.com/s/files/dylan-candy-bar-homepage.jpg
Or you can use the file title without dashes “-” as alt titles and so on.
In brief, you can reuse the embedded metadata for on-page SEO and save a lot of time!
Optimize images alt tag and title tag
Shopify allows you to personalize the alt tag and title tag of each image (also called alt attribute and title attribute).
When you inspect an image code, the HTML is something like this:
<img src=“image.jpg” alt=“image description” title=“image tooltip”>
These elements help search engines index the image and support screen readers by providing relevant information for blind and visually impaired users:
- Img src means “image source” and points at the image folder/directory;
- Alt represents the description of the image. It is only visible to search engines and screen readers;
- Title is the image tooltip. In other words, it represents the text that pops up when users hover the cursor over the image.
CONCLUSIONS
On-page SEO is an ongoing activity based on macro and micro implementations. According to your Shopify store objectives, spread your SEO budget over the year in order to cover the most important improvements.
Shopify includes an intuitive editor that guides you through basic SEO implementations, but if you really want to outclass your competition in the SERP, you need a team of developers and SEO specialists to bring your Shopify SEO to the next level.
At Lounge Lizard, we provide Shopify SEO solutions according to your budget and digital marketing goals. That’s why I invite you to schedule a free assessment with us to explore our services.
